Creating templates
What templates are, the formats, how to create one, variables, and how they adapt across channels.
Written By Bram Haenraets
Last updated About 1 month ago
Templates are the reusable messages you send. They're used by both Guest Journeys (sent automatically across the stay) and Campaigns (one-off broadcasts) — build a template once, use it in either.

How to create a template
Finding templates
Open Templates from the sidebar. The library lists your templates, grouped into tabs: Active, Drafts, Pending approval, Rejected and Archived. Search and filter to find one quickly.
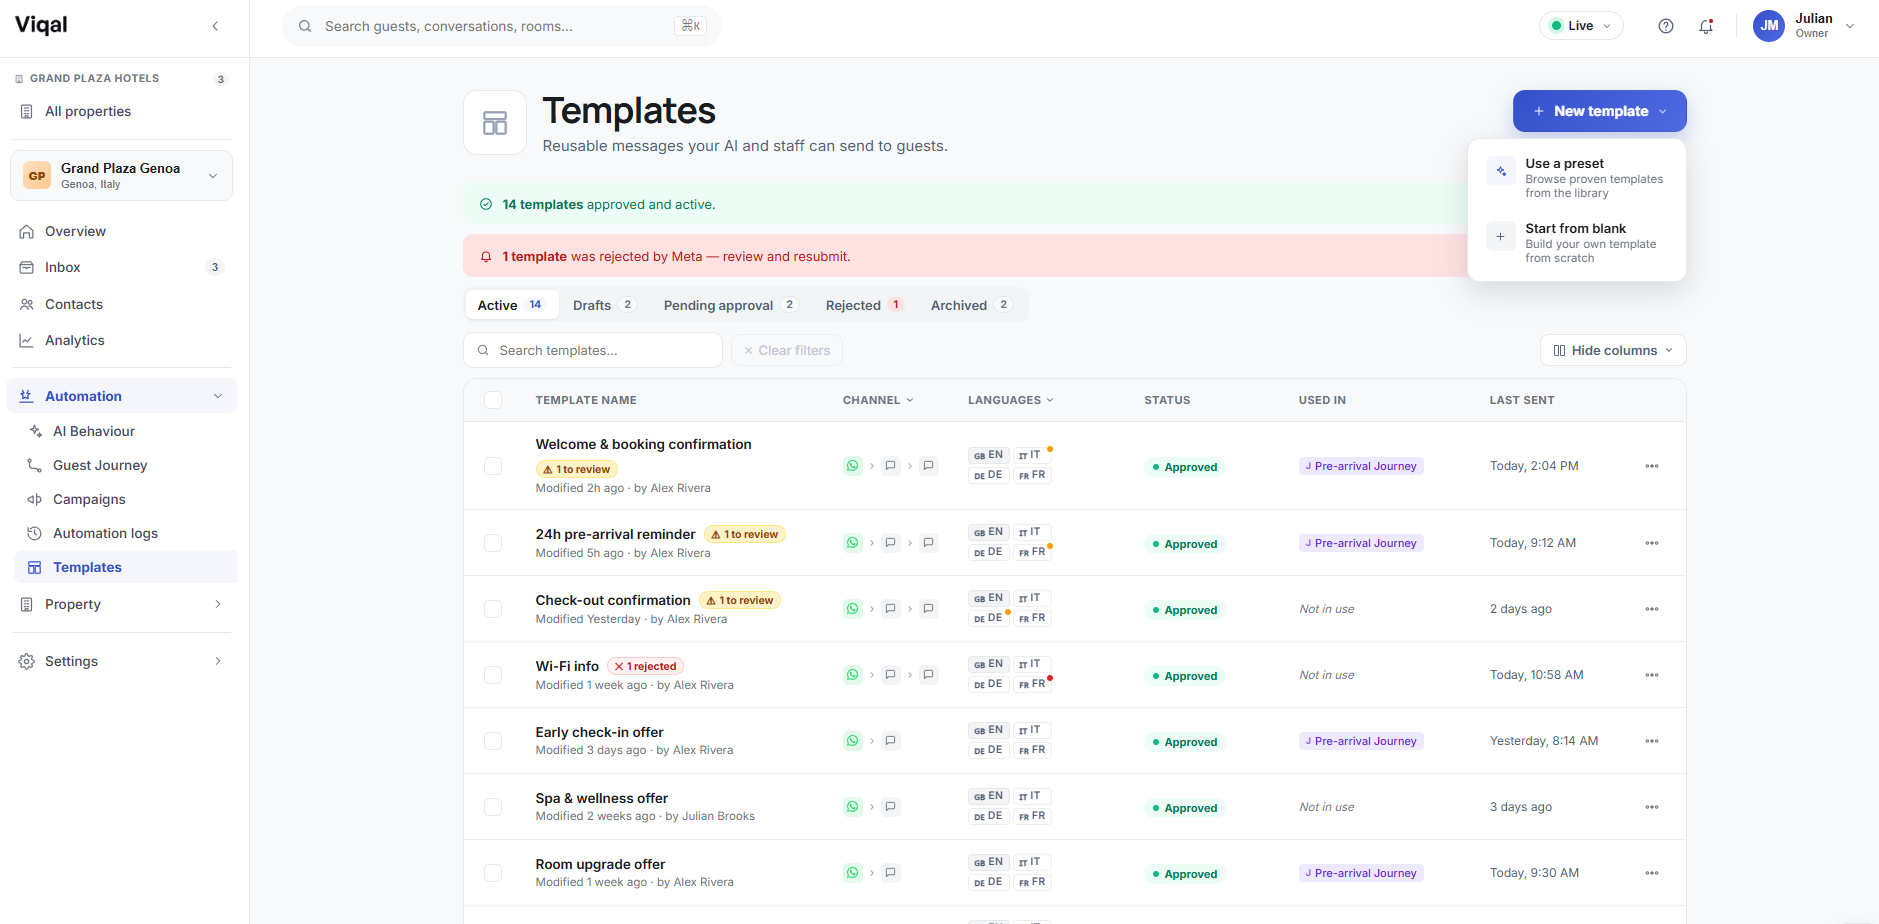
Templates are the reusable messages your AI and your team send to guests. You can start from a preset in the library, or build your own from scratch. This article covers building your own.
Creating a template
The template editor walks you from format to finished message, with a live preview as you go.
Start from a preset or from blank
Select New template, then choose how to begin:
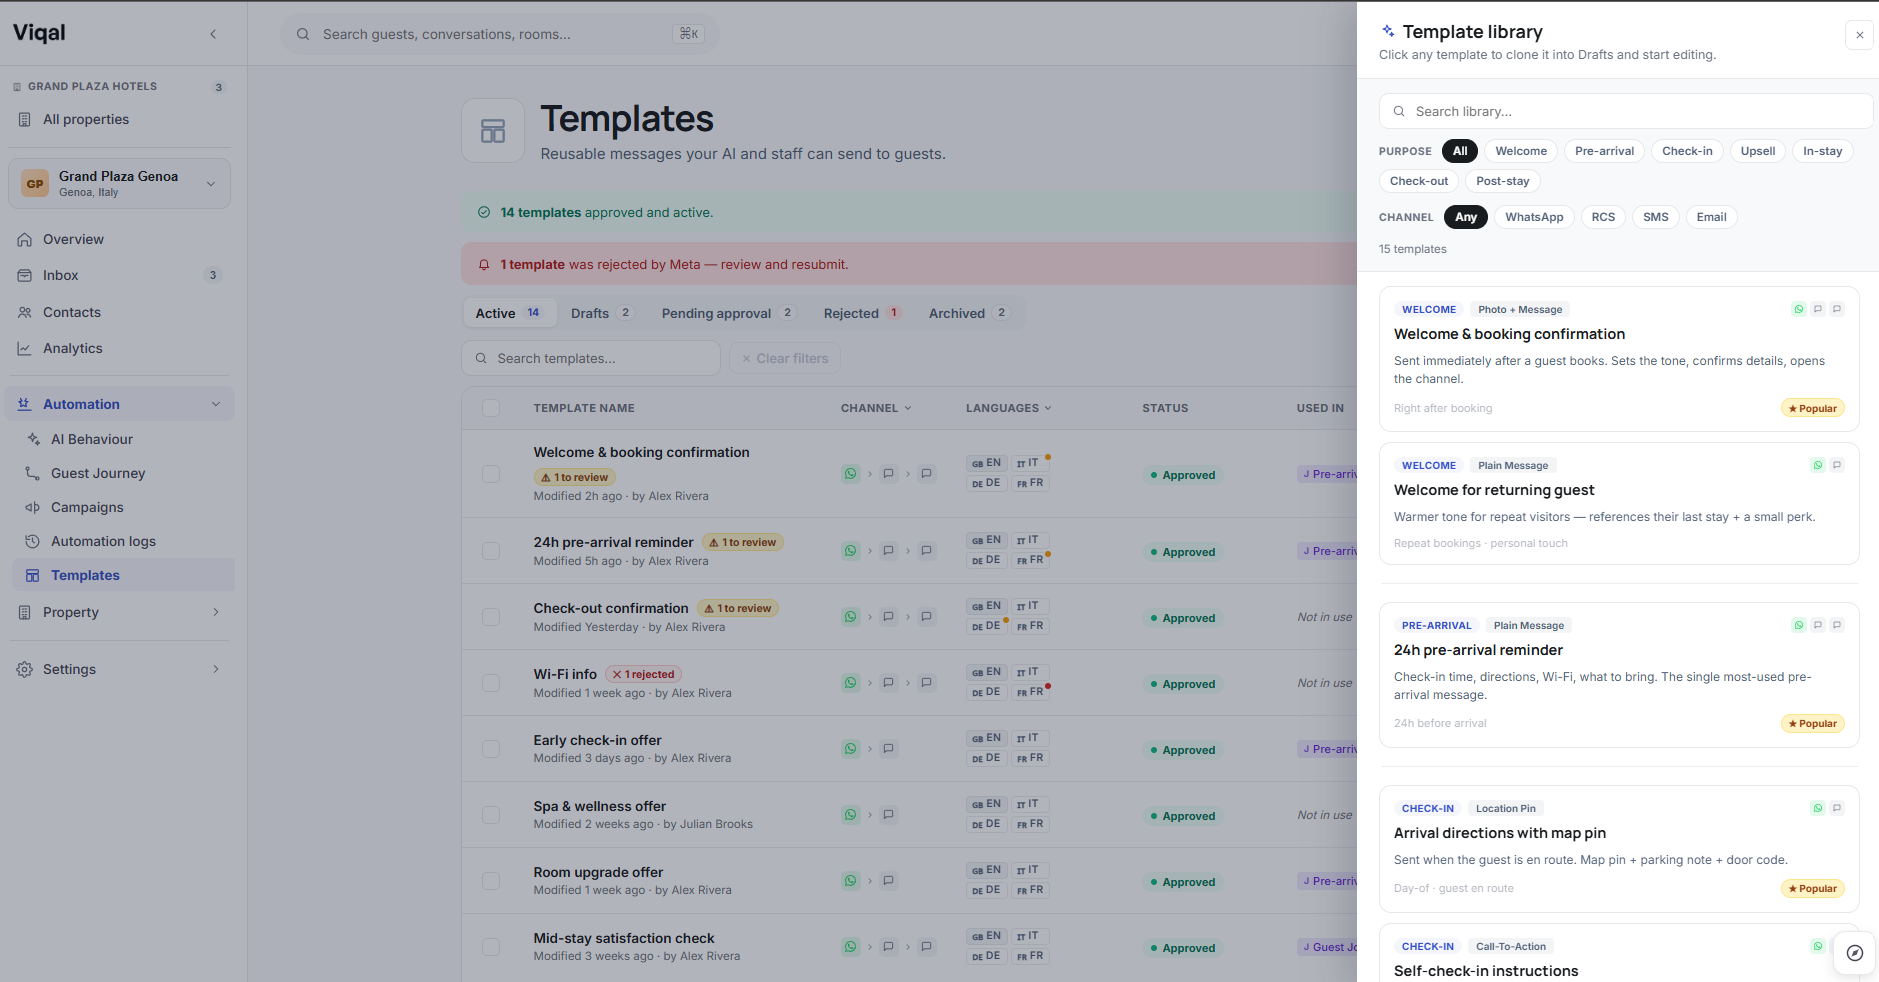
Use a preset — opens the Template library. Filter by purpose (Welcome, Pre-arrival, Check-in, Upsell, In-stay, Check-out, Post-stay) and by channel, then click a preset to clone it into your Drafts and edit.
Start from blank — opens the editor with an empty template.
Step 1: Pick a format
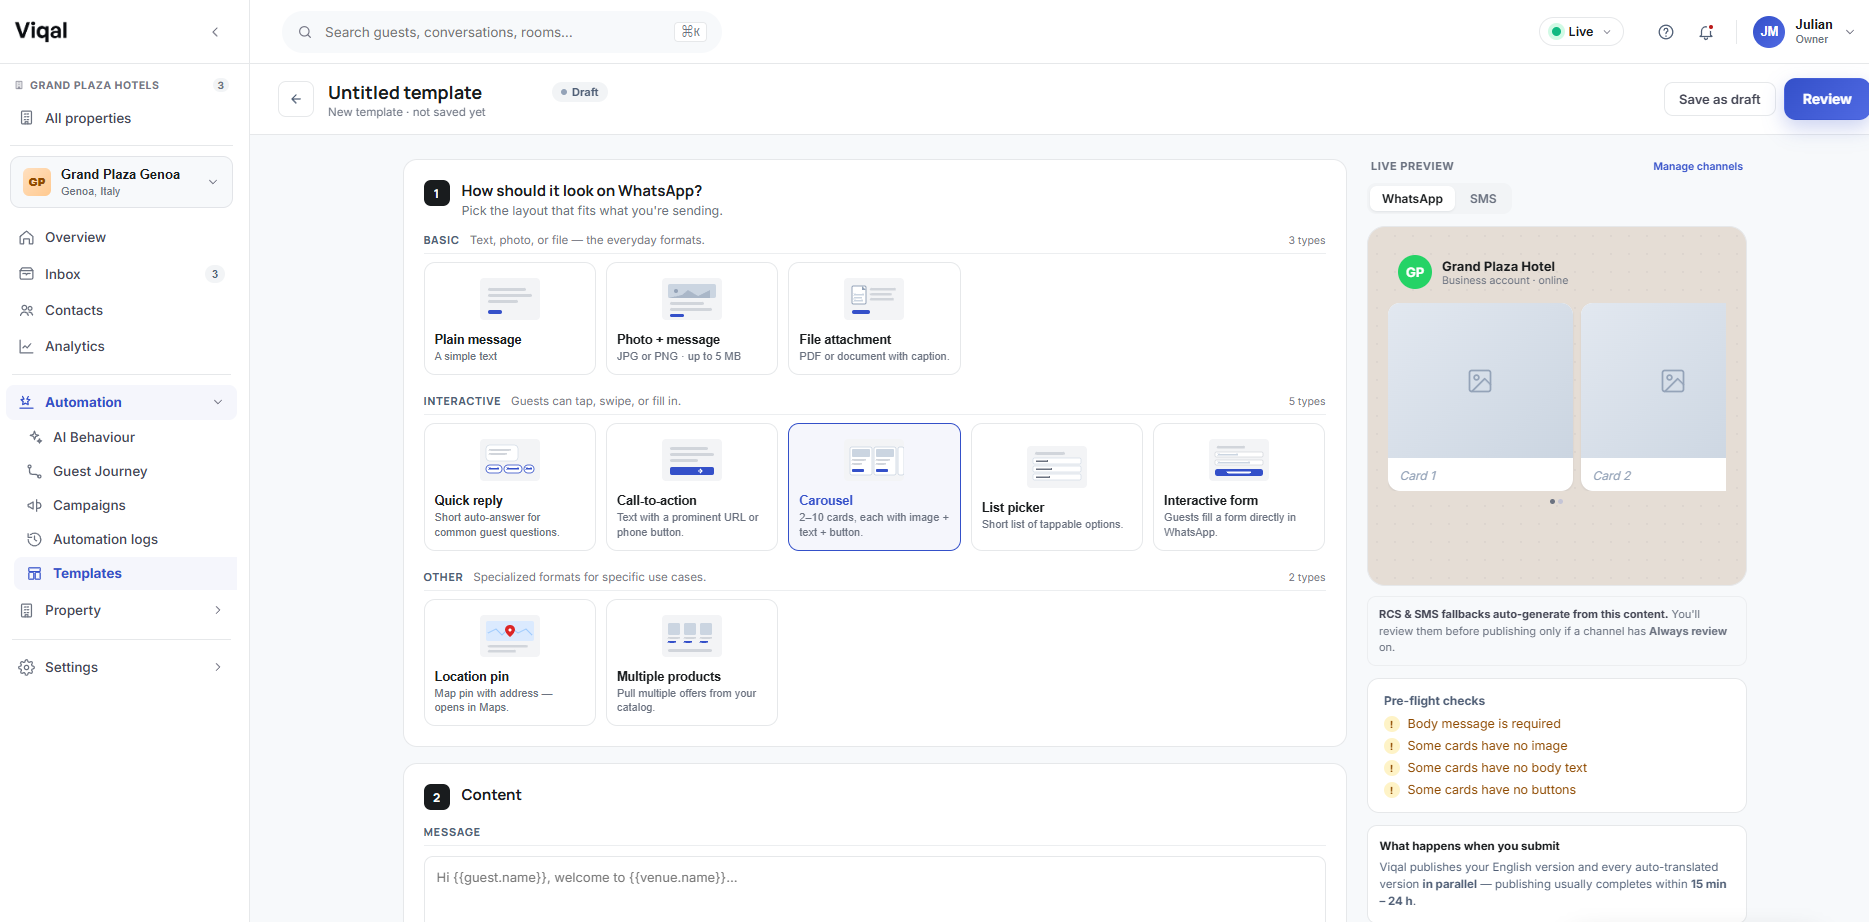
The format decides the layout of your message. There are nine, grouped into three sets.
Basic — text, photo, or file, the everyday formats:
Plain message — text only, the simplest way to reach a guest
Photo + message — a JPG or PNG up to 5 MB, with a caption
File attachment — a PDF or document with a caption
Interactive — guests can tap, swipe, or fill in:
Card — a message with an optional image or file, plus tappable buttons
Carousel — 2 to 10 cards, each with an image, text, and a button
List picker — a short list of tappable options
Interactive form — guests fill in a form directly in WhatsApp
Other — specialised formats:
Location pin — a map pin with an address that opens in Maps
Login code (OTP) — a one-time passcode with a copy-code button
List picker and Location pin only send inside an active 24-hour conversation. In a Guest Journey or campaign, place them after a step where the guest taps a button — never as the opening message to a guest who isn't already chatting. Viqal won't block you, so sequence them correctly.
Every business-initiated format needs WhatsApp approval first — see Template approval and why Meta rejects templates.
Choose the format at the top (see the table above). The content blocks below change to match it. A preset already has a format chosen — change it here if you need to.
Step 2: Write the content
Add the message body guests will receive.
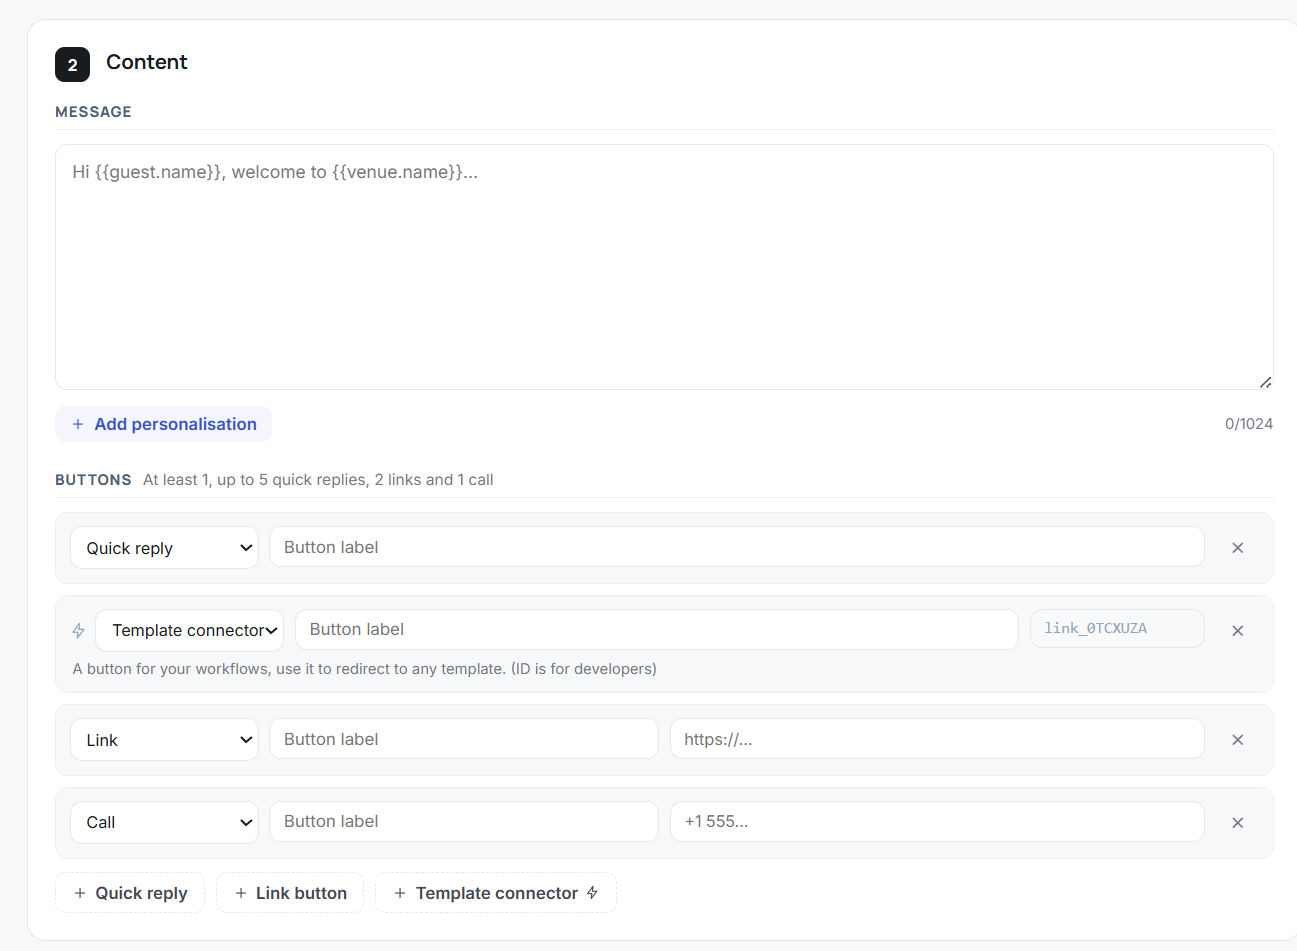
Use variables for anything guest-specific. Click Add variable to insert live booking details, and they fill in automatically for each guest. There is a long list to choose from, including:
{{guest.name}}{{reservation.number}}{{venue.name}}and{{venue.city}}{{reservation.start_date}}and{{reservation.end_date}}
Open Add variable in the editor to see everything available.
A body might read:
Hi {{guest.name}}, thank you for your booking {{reservation.number}} at {{venue.name}} in {{venue.city}} from {{reservation.start_date}} until {{reservation.end_date}}.
Depending on the format you chose, you may also see:
Subtitle — optional, shown under the message
Image or file — optional, drag and drop or click to upload
Step 3: Add buttons
Buttons make a message tappable. A template can have at least 1, and up to 5 quick replies, 2 link buttons and 1 call button:
Quick reply — a tappable canned reply; when the guest taps it, the button's text is sent back as their reply (handy for "Yes" / "No" or "Tell me more").
Link button — opens a URL when tapped (your booking page, a menu, directions).
Call button — dials a phone number when tapped.
Template connector — a button for your workflows that triggers another template when tapped (for example, a "Leave feedback" button that sends your feedback template). The connector ID shown next to it is for developers.
Step 4: Choose how it will be used
When you click Create template, Viqal asks how the message will be sent:
Broadcast is the first message to a guest. It is required to send from a Campaign or a Guest Journey step, and it must be approved by WhatsApp.
Follow-up is triggered by a guest reply or by another template. It does not need WhatsApp approval.
Step 5: Choose a message category
WhatsApp requires a category for every approved template:
Utility — transactional messages tied to a specific action, such as booking confirmations, check-in reminders, and receipts
Marketing — promotional or relationship messages, such as offers, upsells, re-engagement, and post-stay reviews
Choose the one that genuinely describes your message. Then click Generate and review.
What happens after you submit
When it's ready, select Submit for approval and choose the template's category — Utility or Marketing (some formats are automatically classed as Marketing). Depending on what needs checking, this either opens a short review (see Reviewing and translating messages) or submits straight to WhatsApp for approval (see Template approval and why Meta rejects templates).
Your template appears in the list with a status:
Pending — waiting for WhatsApp approval
Active — approved and ready to use
Failed or Rejected — WhatsApp did not approve it. Open it, adjust the content, and submit a new version.
Once a template is Active, you can use it in a Guest Journey step or a Campaign.
Inserting variables
Variables are placeholders you drop into a template that automatically fill with each guest's own details when the message sends. Write {{guest.name}} once, and every guest sees their own name. They're what makes an automated message feel personal — and accurate, because the details come straight from the booking instead of being typed by hand.
There are two kinds: guest & reservation variables (name, email, phone, reservation number, check-in/out dates — filled per guest from the booking, read-only) and property variables (Wi-Fi, breakfast hours, your check-in policy — which you configure in Property → Variables). To insert one, use the personalisation picker in the editor — look for Add personalisation — and it's dropped in at your cursor, so you don't type the exact name by hand.
If a guest doesn't have a value for a variable — say there's no email on file — it renders as blank, so write your message to read cleanly if a variable comes out empty. For the full list of variables and to create your own, see Property → Variables.
Was this helpful?
Still need help? Ask the team